
Looking for Rainbows
A tutorial by Laura aka Pink Princess ©2009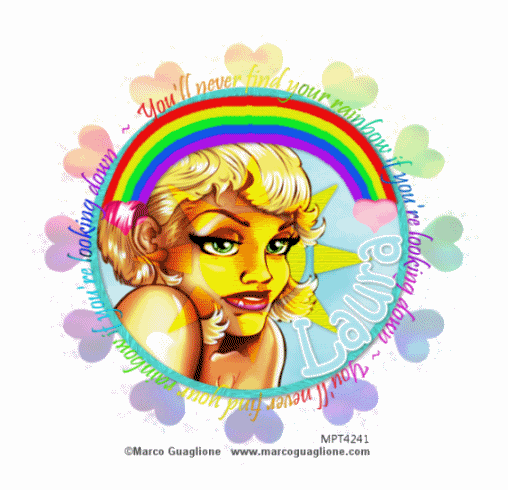
The ideas behind this tutorial are completely my own from my own little head and any resemblance to any other tutorial is purely coincidental.
I have used the gorgeous art work of Marco Guaglione. If you would like to use the same image you must have a license with My PSP Tubes. This tube was a freebie but these are only available for use with your license number so please visit MPT to get one before using this artist’s work, thanks :).
Ok on to the fun part!
You will need -
Rainbow template from my blog.
While there also snag the rainbow wordart or you can recolor the word art that comes with the template - it’s up to you.
I have used Vix mask 44 which you can download from her site - here scroll right to the bottom of the page, i promise it is there hehe.
I’ve also used papers and colours from Steffy’s debut mini kit “little girls’” which can be found here.
You will need eyecandy 4000 hsb noise for animating or you can create your own animation effect.
Ok now we have everything let’s get going!
First open up the supplies in psp and minimise the mask and any tube you are using for now.
Activate the template and hold shit+D to duplicate. Close the original and delete the info layer from the remaining template.
Activate inner circle layer, select all, float, defloat, expand by 1, now either copy and paste a paper of your choice or flood fill a colour of choice. I used paper 5 from the kit. Selections, invert, on the paper layer press delete. Delete inner circle layer. If you flood filled do not delete this layer!! Deselect.
Activate sun layer, select all, float, defloat, expand by 2, floodfill a nice bright yellow. Don’t deselect yet! Go to effects, texture effects, textures, then choose a nice papery texture for the sun. Now deselect.
Activate the circle frame, select, float, defloat, expand by 2, and either paste your paper or floodfill with a complimentary colour. If you paste a paper don’t forget to invert and delete on the paper layer. Deselect.
Activate Rainbow 1, select, float, defloat, expand by 1, floodfill a colour of choice, deselect. Repeat for rainbow 2-5. Now hide all layers except for the 5 rainbow layers and merge visible. Unhide other layers.
Activate rainbow layer, adjust softness, soften. This just gets rid of any sharpness left by floodfilling.
Activate left heart, select, float, defloat, expand by 1, floodfill a nice medium pink colour. Deselect. Repeat for Right heart. Change the blend mode on both these layers to Colour. You might notice some rainbow poking through into the back of the hearts. If you do take your eraser tool, size 10, hardness around 50, activate the rainbow merged layer and carefully delete anything showing through the hearts.
Take the downloaded word art and copy and paste on to your canvas. Delete the word art that came with the template if you are using the downloaded one. If you are recolouring the wordart that is on the template do that now. To make the downloaded wordart fit exactly, take your deform tool and slowly stretch it out to shape. Once finished adjust, sharpness, sharpen.
Now go to canvas size and change it to 650 x 650. Activate the background layer and floodfill white. Add a new layer above this, flood fill this layer with a colour or gradient of your choice. I used the basic rainbow gradient in psp set on radial.
Layers, new mask layer, from image. Find the Vix 44 mask or the mask you are using and apply with luminance checked. Right click this layer in your layer palate and merge group. Set the opacity down to around 30 and duplicate for a total of 3 layers.
On the first go to effects, plug ins, EyeCandy 4000 and choose hsb noise with these settings
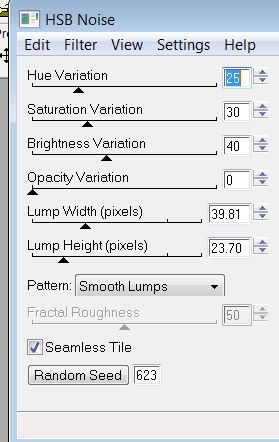
– apply.
Repeat for the other two mask layers but press the random seed button on each before applying.
Now take the tube you are going to be using. Copy and paste it as a new layer, ensuring its above the sun layer but below the frame. Resize it to suit and then click inside the circle frame with your magic wand. Modify expand by 5, invert, on tube layer, delete, select none.
Duplicate this tube layer and on each go to adjust, softness, soften. Then change the blend mode on both to Hard Light.
OK are you still with me?lol
Now it’s time to add any © and license numbers plus your taggers mark if required.
On to the name.
Take your preset shape tool on elipse, background nil, foreground something clashing like black or bright purple and line width on 3ish. Draw out an elipse shape that fits just inside the circle frame. When you’re happy with the shape and size go to image, flip and move it back into position at the bottom of the frame.
Take your text tool, choose font, colours etc and type out your name. It should be appearing the same way as mine, on the inside of the frame. Once your happy with the size and placement of your name click the little + symbol in the layer palate next to the text you just created and x out the elipse layer. Then convert to raster.
Add any drop shadows, effects, embellishments of your choosing now and resize/crop to your liking.
X out the two top mask layers and right click on your image, select copy merged. Launch animation shop and paste as new animation.
Back to psp, X out the bottom mask layer, un X the middle mask layer, right click, copy merged, over to animation shop, paste after current frame.
Back to psp again x out the middle layer, un x the top mask layer, right click, copy merged, animation shop, paste after current frame. Now view your animation! Don’t forget to save and do any more resizing if needed.
Phew that took a lot of explaining but yay my first ever tutorial is written. Thank you for taking the time to do it and I’d love to see your results :D


0 comments:
Post a Comment