
Lucious Leo Tutorial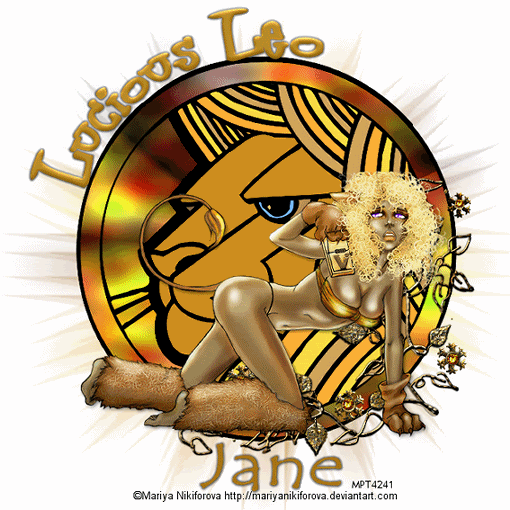
Written by Laura aka Pink Princess on march 31st 2009.
For this tutorial you will need -
Tube of choice. I have used a gorgeous Leo tube by Mariya Nikiforova which i purchased from My PSP Tubes.
If you want to use the same tube you MUST buy it from MPT first.
1 or 2 fonts of choice.
Golden memories scrap kit from Sabre of Quill and parchment he has some lovely kits, and other goodies please take time to browse while you're there.
You can download this kit Here on his blog. Please leave a thankyou if you do download.
My Leo template (in supplies).
Mask of choice.
Eyecandy HSB Noise for animation.
My supplies.
You will need a working knowledge of psp to do this tutorial and a bit of patience lol
Ok lets get going!
Open the template, tube and your mask in psp. Minimise all but the template for now.
On the template go to image, Canvas Size, and change it to 650x650.
Activate the background layer and fill white at the transparent edge.
Now this may take you a few minutes but its worth doing it properly for a fab tag finish!
Take your magic wand, on the following settings
Mode= add/shift tollerance 10, anti alias and contingious checked.
Activate the Outline layer on the template and click inside the lions face, it might take a few clicks to select all of it.
Once done, selections modify, expand by 2.
Add a new layer below the outline layer and floodfill the face sections a colour of choice.
Deselect.
Now we're going to colour his mane.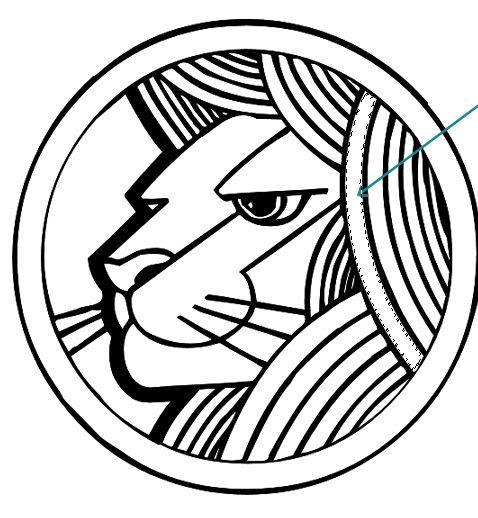
Take your magic wand and activate the outline layer again. Select roughly every 3rd space of the mane.
Add a new layer and drop it below the outline layer but keep it active.
Selections, modify, expand by 2. Floodfill a colour of choice. I used a pale brown at this stage.
Deselect.
While still on the same layer check for any tiny little spaces you may have missed that should be the same colour and using your freehand tool carefully select around each space. Selections, modify, expand by 1-2 depending on how accurate your freehand was. Floodfill with the same colour.
Deselect.
Pick another lion-ish colour. I chose a pale yellow this time. And taking your magic wand on the same settings, activate your outline layer again and select some more spaces. Aiming for half of the ones left blank now.
Once you've selected the ones you want, selections, modify, expand by 2. Add a new layer, drop below the outline layer and floodfill the selections with your chosen colour.
Dont deselect yet! Take your freehand tool and select any tiny spaces the wand couldnt get to, modify expand by 1-2 depending on your freehand accuracy, flood fill the tiny selections.
Deselect.
Repeat the above steps with a 3rd and final colour. I used an orangey colour.
Add a nice eye colour by selecting the iris area and colouring blue/green/brown whichever you prefer.
Hooray all fiddly bits are done!
Now hide your outline layer and background layer and merge visable the others. Unhide the outline and background and activate the outline layer again.
Grab your magic wand on the same settings as before and this time select all the spaces in front of the lions face and the gap between the edges of the circle and the face. Set your foreground to a gradient of choice. I used the metalic gold that comes with psp 9. Set to radial, add a new layer and drop it below the outline layer.
Selections, modify, expand by 2-3 see which looks best on your tag then floodfill this layer with the gradient.
Deselect.
Duplicate this gradient layer for a total of 3.
On the bottom layer add eyecandy HSB noise with the following settings -
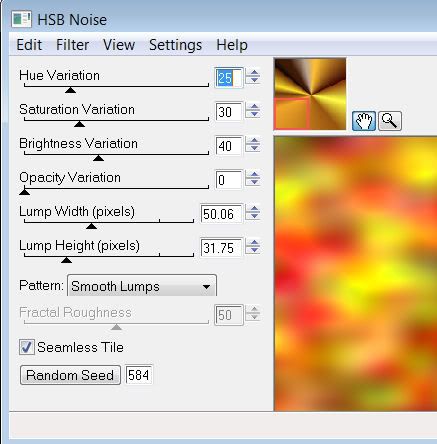
Activate the second layer and add the same settings again but press the random seed button once.
Activate the last of the 3 gradient layers and apply the settings again pressing random seed once more.
Now activate the background layer.
Choose a paper from Sabre's golden memories kit and copy and paste it as a new layer just above the background.
Layers, new mask layer, from image. Browse to your mask in the dropdown box and apply with luminance checked. Right click this layer in the pallete and merge group.
I duplicated my mask and rotated the duplicate a little to make it seem like there were more flares.
Choose any elements and embelishments you like from the kit and resize and place them where required.
Now set your foreground onto some crazy colour like neon green, one that really clashes with your tag and background on nil.
Grab your preset shape tool set on elipse, line width of 3 and draw out a circle the same size as the lion template.
Select your text tool and choose a font, hold your mouse over the top left edge of the circle and when you see your curser turn into an A click. Now change the colour of your background to a complimentary colour from your tag and turn the foreground off. Size of around 40, type out Lucious Leo, or any other phrase you like.
Click the + sign next to the vector layer in your pallette and X out the elipse layer. Then right click and convert to raster.
Add bevel or filters to your text now.
Add a drop shadow too if desired.
Add your tube and a dropshadow of choice.
Using the same background colour grab your text tool again and type out your name/text at the bottom. Convert to raster and add any text effects you desire.
Add all © information and license number if required.
Now X off the top two gradient layers in your pallette. Right click the top bar of your canvas and copy merged.
Paste into Animation shop as a new animation.
Back to psp, un X the middle gradient layer and right click, copy merged again.
Back into ani shop, paste after current frame.
Back into psp, un X the top gradient layer and right click, copy merged.
Back into ani shop paste after current frame.
View your animation!
If you like the speed then save as gif. and your done.
If you'd prefer it faster or slower play around with the frame properties until you have the speed you want.
Thanks for trying my tutorial :]


0 comments:
Post a Comment