
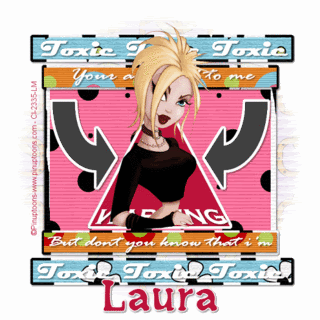
TOXIC SHOCK
This tut was inspired by Laura’s fab template,
Artwork (c) Pinuptoons. Do not use this tube without a valid licence to do so, if you require this tube and licence go to CILM.
This tut also assumes you have prior knowledge of psp and its tools, I am using psp 9 to write this tut cost thats the only one I like, you can of course use which ever version you prefer.
SUPPLIES
Scrap kit is called Trendy Girl and is the fab work of Karla at Lacarolita’s Designz and can be found HERE – don’t forget to say thank you for this brilliant scrap kit.
ONTO THE TUT
Open and duplicate the template (shift + D) and save the original for use again. Delete the (c) layer. Increase the canvas size to 700X700
Go to the template and find layer square frame ~ selections ~select all~ selections float-defloat ~add paper 4 as a new layer selections invert and click delete on your keyboard, then delete the original layer.
Repeat the steps above with layers t rect frame, b rect frame, t rect sm frame, b rect sm frame. Then add a drop shadow to each layer i used 2,2,50,5 black.
Go to the square inner frame ~ selections ~select all~ selections float-defloat ~add paper 1 as a new layer selections invert and click delete on your keyboard, then delete the original layer.
Find the bot rect layer and ~ selections ~select all~ selections float-defloat ~add paper 7 as a new layer selections invert and click delete on your keyboard, then delete the original layer. Repeat for top rect layer.
Find the bottom and top toxic layer and add the same drop shadow.
Find the t rect sm layer ~ selections ~select all~ selections float-defloat ~add paper 7 as a new layer selections invert and click delete on your keyboard, then delete the original layer. Repeat for b rect sm layer.
Add the same drop shadow to the addicted and but don’t... layers.
Find the Right Arrow layer ~ selections ~select all~ selections float-defloat add a new layer and flood fill with #bd143b. Find the right arrow frame layer and ~ selections ~select all~ selections float-defloat add a new layer and flood fill with #ffffff . Repeat with the left hand arrow, rename these layer red1 and red 2** BUT DO NOT** delete the original arrow layer! We need that for the animation.
Add the same drop shadow to the frames of the arrows, are you still with me lol
Find the tri frame selections ~select all~ selections float-defloat add a new layer and flood fill with #ffffff then find the triangle top ~ selections ~select all~ selections float-defloat add a new layer and flood fill with #bd143b and delete the original layers.
Go to the background layer and add a paper or colour of your choice and mask of your choice.
Click onto the very top layer, and add your tube as a new layer, add your (c) info and the name u wish to use,
To animate
find the layers you name red 1 and red 2 and X out copy merged and open animation shop, paste as a new animation un X the 2 red layer copy merged in AS paste after current frame change the animation properties to 15 resize to you liking and save as a gif.
All done!
This tutorial was written by Steffy on 17/04/09 and was made out of my head through inspiration from my partner in crime Laura!
No not copy this tutorial but feel free to link anyone here to our blog to download the supplies,and don’t forget to show us what you have made


0 comments:
Post a Comment