Sunday, April 26, 2009

Picture This

Picture this
Photobucket
Supplies needed HERE
3 tubes of you own choice WSL mask 181 HERE navigate ~ downloads ~ and find the right number :)

I am using the artwork of Pinuptoon's which are only available for CILM HERE
The tut

Open a new raster layer 600*600 Flood fill with white Copy and paste the Polaroid tube as a new layer.
Photobucket
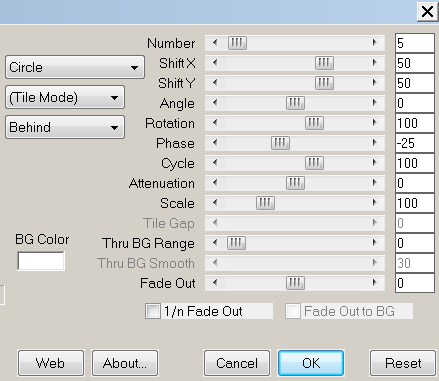
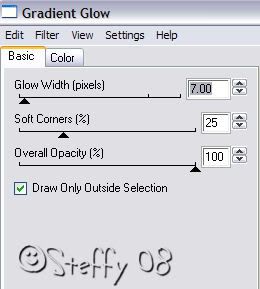
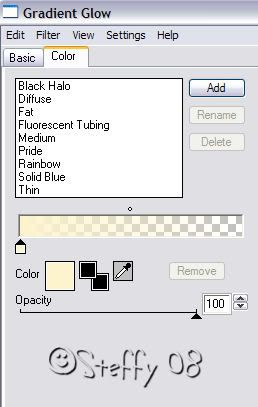
Click inside the black area of the first Polaroid with your magic wand with the following setting like so
Photobucket

Photobucket


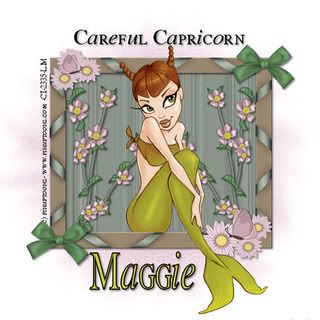
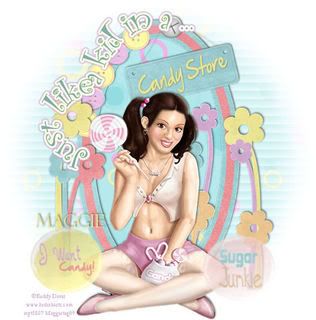
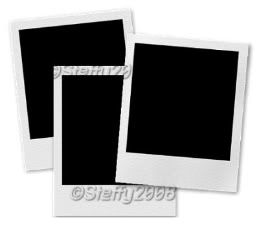
Find the first tube you are using re size to your liking, ( I resized mine by 60% smart size as this stops the jaggered edge on the tube )
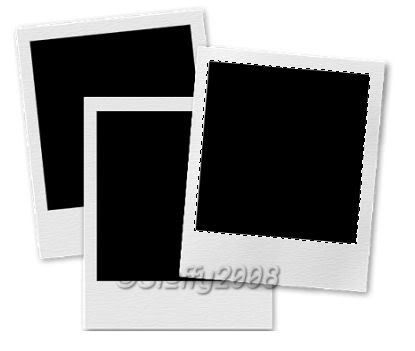
Then copy and pate as a new layer move the tube into the picture then selections invert then click delete on your keyboard, selections select none. It should look something like this.

Photobucket


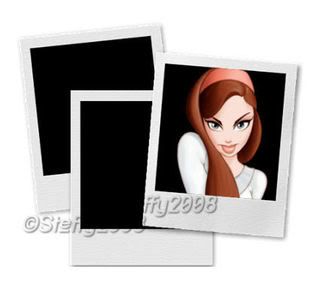
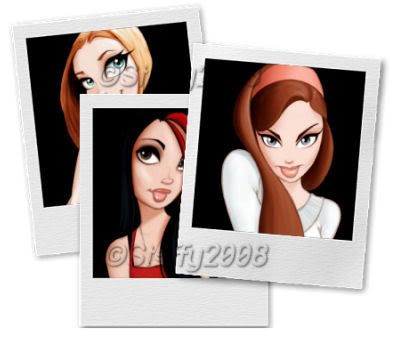
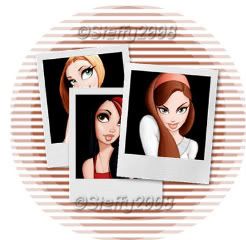
Repeat this process with the other 2 pictures making sure that u always go back to the Polaroid layer when using the magic wand. When u have finished you should have something like this.

Photobucket
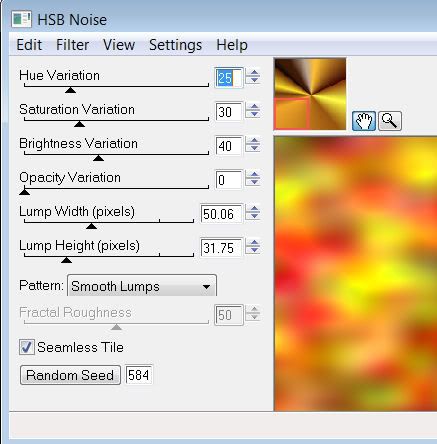
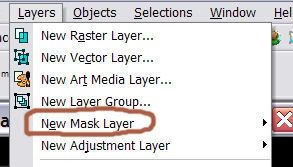
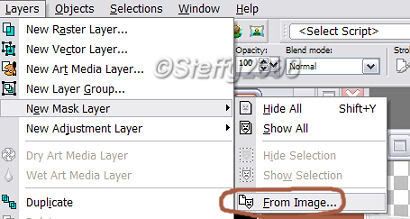
Go to the very bottom layer and add a new layer flood fill it with a colour that matches with your tubes Open WSL mask 181 then go to layers ~ new mask layer ~from image ~ click the drop down box and find WSL mask 181 source luminance ticked invert mask unticked like so
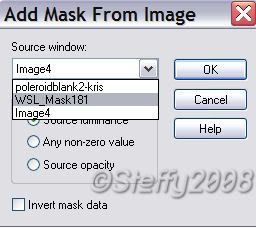
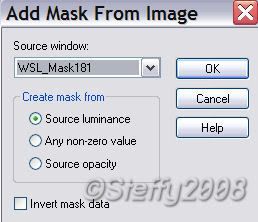
Photobucket
Photobucket
Photobucket Photobucket

then click ok

Then your layer palette should look something like this Right click the layer that says mask and merge group. You should have something like this

Photobucket

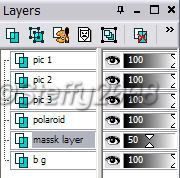
Staying on the mask layer re size this layer ONLY by 85% bicubic. Then in the layer palette move the opacity to around 50% like so


Photobucket
Photobucket


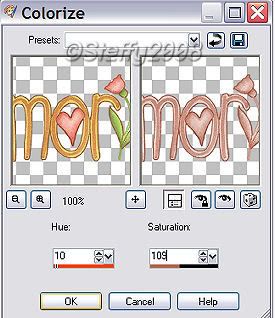
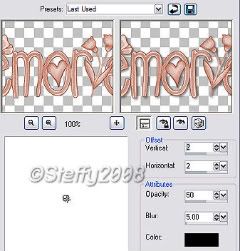
Make sure you are on the top layer and add the word art as a new layer re-size by 85% Bicubic then colorize to your like. To colourize got to the colour you used for the mask layer and look at the colours numbers and remember the ones i have circled. Then go to Adjust ~hue and saturation ~colourise~ and in the 2 boxes put the 2 numbers u have just remembered. In my case it was 10 & 109 look at the screen shot below.


Photobucket
Photobucket
Photobucket

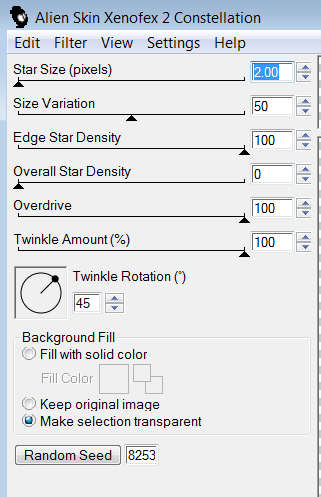
Effects 3 d effect drop shadow with the following settings

Photobucket
Add your name (I added the same drop shadow to my name ) and © info. Now if u want to stop there u can do, just save merge layers flatten and save as a Jpg. If u want to animate then carry on after u have added the name and © info.

To animate
Merge visible the 3 tubes u placed in the Polaroid and put the opacity down to nil edit copy merged then open animation shop and paste as a new animation, back to psp change the opacity on the merged layer to 26 edit copy merged animation shop edit past AFTER the current layer back to psp change the opacity to 30 edit copy merged edit paste AFTER current layer carry on doing this changing the opacity a little bit at a time until u have the opacity on 100%

I have 10 layers. Nearly done now lol

Go Edit select all then to animation frame properties and change the number to 40 on all frames.
Photobucket

Then click on the last frame to make the blue box go round just that frame and change the number to 100 then resize to your liking, and save as a gif Save as a gif
Hey presto u have a new tag!
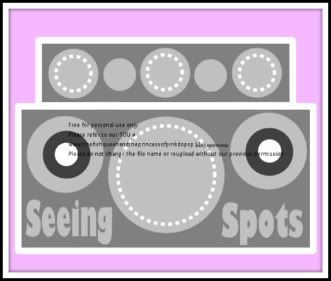
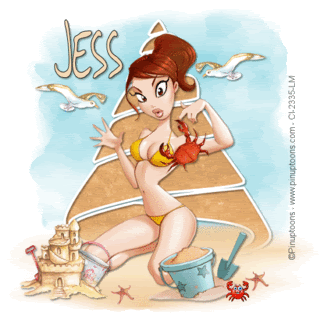
Here is the non animated version
Photobucket

This tut was writted by moonwhiper 16/10/08
it was out of my head so any one else written one simular im sorry, but its just co-incidence, this tut may not be copied in any part anywhere else

Friday, April 24, 2009

*New Tut* Spring flowers *

Spring flowers

Photobucket
This tutorial assumes you have prior knowledge of the workings of psp, I am using psp 9 cos I like that one, although there is no reason it can’t be done in other versions.

I am using the awesome artwork of Rion Vernon aka pinuptoons only available at CILM
Do not use this artwork without a licence to do so


Supplies

Scrap kit by Armazem Scraps called Spring time it’s her addition to a spring time blog train available HERE

Template 12 by Maggie HERE
the animation I used is HERE I cant remember where i got this from if its yours let me know and i will either remove it or add your (c) info to it :]


Onto the tut
Open the template in psp shift + D to duplicate then save the original one to use again.

Image canvas size increase to 650X600 add a new layer and send it to the bottom, fill with white.
Find the grey rectangle layer selections ~select all ~selections float ~ defloat add a new layer then go to the scrap kit, copy and paste paper 6 INTO selections, select none then delete the original rectangle layer. Find the Grey flower stem layer selections ~ select all ~selections float ~ selections defloat grab paper 13 paste as a new layer selections invert then press delete on your keyboard, making sure you are on the paper layer, selwections~select none add a drop shadow.

Find the white frame layer and add a drop shadow to that.

Fins the grey flower layer selections ~ select all ~selections float ~defloat and add paper 1 as a new layer. Selections ~ invert and press delete on your keyboard. Again making sure you are on the paper layer then delete the original flower layer and add a drop shadow to your new flower. Add a drop shadow to your flower frame layer.
Go to the circle layer delete that and the frame and in its place add element 10 resized by 90% add a drop shadow.

Resize the sunshine element by 60% x2 and place on the right hand side, see mine for placement.

Go to the bottom layer the one you filled in white and add paper 7 as a new layer re size to your liking and add a mask. I used cbj mask 05 which is in the supplies.
Merge group.

Add your tube as a new layer at the very top and add a drop shadow to it.
Add your name and (c) info.


To animate
Edit copy merged and paste in AS, as a new animation edit duplicate, find the animation I included in the zip and go edit select all edit copy back to your tag edit select all edit paste INTO selected frame.
Resize to your liking, and save as a gif,


This tutorial was written by steffy 11/04/09
Any similarity to other tuts is a co-incidence; feel free to text link only to this tut.
But do not claim it as your own cos its not yours its mine

Monday, April 20, 2009

Template - Seeing Spots

I was playing around in psp so much that i got spots in my eyes lol
So i thought id make it a useful experience and make a template based on it.
Hope you like it and if you do create anything with it id love to see it!

Photobucket

Download Here

Friday, April 17, 2009

Toxic Shock *new tut*

TOXIC SHOCK
Photobucket

This tut was inspired by Laura’s fab template,

Artwork (c) Pinuptoons. Do not use this tube without a valid licence to do so, if you require this tube and licence go to CILM.

This tut also assumes you have prior knowledge of psp and its tools, I am using psp 9 to write this tut cost thats the only one I like, you can of course use which ever version you prefer.


SUPPLIES

Template HERE

Scrap kit is called Trendy Girl and is the fab work of Karla at Lacarolita’s Designz and can be found HERE – don’t forget to say thank you for this brilliant scrap kit.


ONTO THE TUT

Open and duplicate the template (shift + D) and save the original for use again. Delete the (c) layer. Increase the canvas size to 700X700

Go to the template and find layer square frame ~ selections ~select all~ selections float-defloat ~add paper 4 as a new layer selections invert and click delete on your keyboard, then delete the original layer.

Repeat the steps above with layers t rect frame, b rect frame, t rect sm frame, b rect sm frame. Then add a drop shadow to each layer i used 2,2,50,5 black.


Go to the square inner frame ~ selections ~select all~ selections float-defloat ~add paper 1 as a new layer selections invert and click delete on your keyboard, then delete the original layer.

Find the bot rect layer and ~ selections ~select all~ selections float-defloat ~add paper 7 as a new layer selections invert and click delete on your keyboard, then delete the original layer. Repeat for top rect layer.

Find the bottom and top toxic layer and add the same drop shadow.
Find the t rect sm layer ~ selections ~select all~ selections float-defloat ~add paper 7 as a new layer selections invert and click delete on your keyboard, then delete the original layer. Repeat for b rect sm layer.

Add the same drop shadow to the addicted and but don’t... layers.

Find the Right Arrow layer ~ selections ~select all~ selections float-defloat add a new layer and flood fill with #bd143b. Find the right arrow frame layer and ~ selections ~select all~ selections float-defloat add a new layer and flood fill with #ffffff . Repeat with the left hand arrow, rename these layer red1 and red 2** BUT DO NOT** delete the original arrow layer! We need that for the animation.

Add the same drop shadow to the frames of the arrows, are you still with me lol


Find the tri frame selections ~select all~ selections float-defloat add a new layer and flood fill with #ffffff then find the triangle top ~ selections ~select all~ selections float-defloat add a new layer and flood fill with #bd143b and delete the original layers.

Go to the background layer and add a paper or colour of your choice and mask of your choice.

Click onto the very top layer, and add your tube as a new layer, add your (c) info and the name u wish to use,


To animate

find the layers you name red 1 and red 2 and X out copy merged and open animation shop, paste as a new animation un X the 2 red layer copy merged in AS paste after current frame change the animation properties to 15 resize to you liking and save as a gif.

All done!

This tutorial was written by Steffy on 17/04/09 and was made out of my head through inspiration from my partner in crime Laura!
No not copy this tutorial but feel free to link anyone here to our blog to download the supplies,and don’t forget to show us what you have made

Thursday, April 16, 2009

*New Kit* Pink & Purple rule!

New Scrap Kit
PINK & PURPLE RULE!

Photobucket

Photobucket

Download HERE

Monday, April 13, 2009

Freebie Template - Toxic & Slideshow news

A quick and very random freebie.
Photobucket
I made this as i had the Britney song in my head and was feeling in a psp mood lol
As always if you make anything with it id love to see the results!
Download
here.

Now onto the slideshow!
Im putting together a slideshow to pop on the blog so its easier to see whats here and what isnt (yet lol).
If you've made a tag or anything else with anything from the blog please email it or bung us a link to it in the shoutbox and ill try to include it.
Obviously only do this if you want us to add it, i mean heck, im not bullying you into giving me your tags - i hope lol
The email is somewhere on the blog but if not
pinkprincess5681@gmail.com its here too :]

Lustrous Libra

This tutorial assumes you have a working knowledge of psp and some of its tools.

Photobucket

To complete this tutorial you will need;

A tube of choice. Im using the gorgeous art work of David Boller www.tuskentertainment.com .

To use his art you must purchase a license from Up Your Art first.

Mura's Meister Copies

Alien skin Xenofex 2 constellation (optional as its only for animation)

Font/s of choice

and

My supplies which can be found here :].

Open a new image 650x650 transparent canvas. Floodfill with white.

Open the scales and sky cloud from my supplies and minimise the sky cloud for now.

Copy and paste the scales onto the canvas and go to mura's copies.
Select Encircle and apply as below -

Photobucket

Choose a nice pastel colour from your tube as your background. Foreground on nil.

Grab your preset shape tool set on circle and draw out a medium sized circle on your canvas and move below the scales layer. Ensure the edges of the circle meet with the top line of the scales and then convert to raster. If the circle is too small or too big play about with the nodes until its the right size before converting.

Go to Adjust, Blur, Gausian blur with a radius of 8-10 depending on the colour you selected, apply.
Repeat.

Copy and paste the skycloud on to your canvas and duplicate. Keep one at the top and X it out.
Move one below your blurred circle layer. Duplicate this a few times until you have covered all the edges of the circle with it. You might want to rotate or mirror the duplicates to get a better difference around the edges.

Copy and paste your tube as a new layer. Move it below the top sky cloud layer and un X that skycloud now.
Duplicate the skycloud and then flip and mirror it. Place the duplicate next to the first to cover the lower section of your tube. Merge these two visable.

Hide all layers except for the lower sky cloud layers. Merge them visable. Add a drop shadow of choice in WHITE.

Un X all other layers.

If your animating your tag follow the next steps if not please skip them and go straight to the text addition further down.
Activate your tube layer and duplicate for a total of 4.

X out the bottom one and the top two. With your remaining tube layer active go to xenofex 2 constellation and apply with the following settings -

Photobucket

Repeat this for the next two higher tube layers pressing random seed once each time.
X out all xenofex layers.

Join back here if you skipped the animation.

Activate the top layer in your canvas and grab your preset shape tool set on elipse. Line width of 5, background nil, foreground black.

Draw out a circle lining it up with the outside of the scales. Dont convert to raster!!
Grab your text tool and hold your cursor over the elipse you have just drawn until it changes into an A and then click, choose a font , change the foreground and background to gold or any other colour of choice and type out your title, I wrote Lustrous Libra.

When done Click the + in your layer pallette next to the vector layers and X out the elipse layer. Right click the text layer, Convert to raster.

Use the same method to add your copyright and if needed license info and taggers mark if required.

Change your foreground and background to the same colour as your inner circle and type out your name over the skycloud layer in the lower part of the tag. Once satisfied with it convert to raster and add a gradient glow or drop shadow of choice to the text.

Drop shadow any other layers you want to and resize all layers to your liking.

If you arent animating save your tag in your preferred format and thank you for trying my tutorial :].

If you are animating un X the first xenofex layer and right click the top bar of your image, copy merged, over to animation shop, paste as new animation.

Back to psp, X out the first xenofex layer, Un X the middle one, copy merged, into animation shop, paste after current frame.

Back to psp again, X the middle xenofex layer, Un X the top one, copy merged, into animation shop, Paste after current frame.

Right click view animation, save as .gif and your done!

Thanks for trying my tutorial and please if you do complete it share your results as id love to see them!!

This tutorial was written on April 13th 2009 by Laura.
Please do not repost or translate without my express permission.
Items in my supplies are not to be shared outside of this tutorial although you may use them for yourself.
If linking please use a text link. Do not hotlink to our pictures - thanks :].


Sunday, April 12, 2009

Certainly Cancer

Certainly Cancer
Photobucket


This tutorial assumes you have prior knowledge of psp and its tool. This tutorial was written in psp9. I am using the awesome artwork of Rion Vernon aka pinuptoons. His artwork is only available from CILM. Please do not use this image unless you have a licence to do so.

Supplies needed

Cancer template

My supplies HERE (including template)

I am using Maggie’s Sand thank you Maggie, you can find Maggie’s awesome work

or


Onto the tutorial

Open the template in psp shift+D to duplicate and close the original, for later use.
Open all other supplies in PSP.

On the template copy and paste Maggie’s sand as a new layer and place at the bottom of the shell, go to the inner layer of the template selections ~ select all ~ Selections float ~defloat ~ copy the paper as a new layer (or feel free to use your own) selections ~ invert and making sure you are on the paper layer hit delete on your keyboard. Select none.
Go to the outer layer and add a drop shadow of your choice I am using 2,2,50,5 black.

Copy and paste your tube as a new layer and place where you like, see mine for my placement. Resize the sandcastle by 60% and place to your liking or again see mine for placement. Find the nautical accessories and copy and paste elements to your liking.


Go to the paper 5 layer and add as a new layer just above the background layer. Re size by 80% and move up a little, then apply mask KRD mask 9 and merge group. Grab your deform tool and deform it so it looks like sky.


Add a drop shadow to all element layers but NOT the sand!

Add your (c) info and name.

To animate

Copy merged, and open AS paste as a new animation. Duplicate so you have 2 identical layers find the animation I provided and edit select all ~ edit copy then back to you tag edit selection all ~ edit paste into selected frame place to your liking once again see mine for placement.
Re size to your liking and save as a gif.
This tutorial was written on the 11/04/09 By Steffy, any likeness to other tuts is a coincidence and not done to cause upset. Fell free to text link only to this tut, and remember our TOU.
thanx

Saturday, April 11, 2009

Careful Capricorn

Careful Capricorn.
Photobucket


This tutorial assumes you have prior knowledge of psp and its tools I used psp9 to write this tutorial.

I am using the wonderful art of Rion Vernon (pinuptoons) only available from CILM do not use this tube without the proper licence to do so.

Supplies needed
Scrap Kit ‘Surprise freebie’ by Wench designs HERE
Mask of choice
Word art
HERE


Let’s get started!
Open the frame and resize by 40% then 70% and paste as a new layer. Grab your magic wand click inside the frame and go to selections ~ modify expand by 4.

Find paper 4 from the kit resize by 40% X 2 then 90% paste as a new layer selections ~ invert then press delete on your keyboard, and move this layer below your frame.
Stay in the paper layer and grab the apple blossom branch re size by 40% x 2 and paste in the left hand corner of the frame, look at my tag for placement, duplicate this layer and mirror so it is now also on the right hand side of the frame, check they are both below the frame or it will look odd lol.

Grab bow 1 resize by 40% x2 and add as a new layer making sure you are on the top layer duplicate this layer and move it to the bottom of the frame see mine for placement.

Add your tube and erase a little bit to make it look as if she is sitting on the frame, add a drop shadow of 2, 2, 50, 50 to the frame, apple blossom and bow layers.

Go to the very bottom layer resize paper 3 as above and add the mask, use the distortion tool to make it the right size around the frame, add my word art as a new layer on the top layer add your name and (c) info. And your name, then save as a jpeg.


This tutorial was written on 06-04-09 by Steffy and was out if my head, so if it’s like another tutorial you have seen that’s a coincidence. And great minds think alike!
Feel free to text link only to this tutorial do not hotlink.
Thanx

Friday, April 10, 2009

Easter Freebies

2 new Easter Freebies for you today

Hoppy Easter Template. If you use this please come back and show us what you have made :)

Photobucket

Download it HERE

And

Photobucket

Download them HERE

Wednesday, April 08, 2009

Sugar Junkie

Sugar Junkie!

Photobucket

How fab is this tag???

Maggie at Fantasy Flight Graphics made this from Laura's Scrap kit!

If you want to do this tut Go HERE

If you are not already a member just tell the admins (Ladylove, Me and Maggie) that you saw the tut here and we will let you right in :) While you are there have a look around cos its a fab site.

Monday, April 06, 2009

Very Virgo * New Tut*

Very Virgo

Photobucket


This tutorial assumes you have prior knowledge of psp and the tools.

I am using the awesome work of Rion Vernon (pinuptoons) only available from CILM please do not use this tube if you don’t have a licence to do so, feel free to use another tube artistic licence is encouraged :)

I am using the fantastic scrap kit from Blue Dreams designs Called April Showers download it HERE.

The template is my own download that HERE.

Filter used eye Candy 4000.

Mask 134~T HERE


On to the Tutorial

Open the template shift + D to duplicate it and save the original one in case you want to use it again. Delete the (c) layer.

Go to the inner layer selections ~ select all ~ selections ~ Float ~ slections defloat, and add paper 3 from the scrap kit as a new layer, still on that layer selections ~ invert then press delete on your keyboard. Now onto the outer layer and add a drop shadow of 0, 0, 35, 7 colour black.
Add your tube as a new layer, and add a drop shadow I used the same drop shadow as before.

Now find the Very Virgo word art go to Eye candy 4000 and add a gradient glow using the settings below.
PhotobucketPhotobucket

Go to the bottom layer and add doodle 3 from the scrap kit as a new layer duplicate and mirror merge these two together and place to your liking. Add a drop shadow

Back to the scrap kit find worm 1 resize by 70% twice and mirror then add to your tag.

See mine for placement.

Back to the bottom layer add paper 5 from the scrap kit as a new layer, then add mask 134~T resize by 80% use your deform tool to place around the tag to your liking, then change the opacity to around 42.

Add your name and (c) info resize to your liking then save as a jpeg.


This tutorial was written on the 5.4.09 by Steffy and is out of my head, any likeness to another other tutorial is coincidental,
Feel free to text link to this tutorial but please do not hotlink.
Thankyou for trying this tutorial

Sunday, April 05, 2009

I Want Candy Taggers scrap kit

I've been a member of Slimming world for almost 12 weeks now and i've lost over 11lbs which is fab but somedays i still get those cravings for sweeties lol
I had a major sweetie craving today so instead of stuffing my face with random sugary snacks i decided to create my first ever scrap kit based on sweets instead.
So heres the result. It has lots of elements (i lost count lol) and 13 papers.
The previews are below and the download link is below those :].
If you do download it please try to leave a comment or a thankyou and if you create anything with it I'd love to see!
Theres no dropshadow on the actual items, only on the previews here.
Hmm and blogger and photobucket have made the preview of the elements all "bitty" they arent rough edged in reality, only on the preview. All elements are not shown either but are in the kit itself :]

Photobucket


Photobucket


Photobucket


Download
Here.

Saturday, April 04, 2009

Lucious Leo

Lucious Leo Tutorial

Photobucket

Written by Laura aka Pink Princess on march 31st 2009.

For this tutorial you will need -

Tube of choice. I have used a gorgeous Leo tube by Mariya Nikiforova which i purchased from My PSP Tubes.
If you want to use the same tube you MUST buy it from MPT first.

1 or 2 fonts of choice.
Golden memories scrap kit from Sabre of Quill and parchment he has some lovely kits, and other goodies please take time to browse while you're there.
You can download this kit Here on his blog. Please leave a thankyou if you do download.

My Leo template (in supplies).

Mask of choice.

Eyecandy HSB Noise for animation.

My supplies.

You will need a working knowledge of psp to do this tutorial and a bit of patience lol

Ok lets get going!

Open the template, tube and your mask in psp. Minimise all but the template for now.
On the template go to image, Canvas Size, and change it to 650x650.
Activate the background layer and fill white at the transparent edge.

Now this may take you a few minutes but its worth doing it properly for a fab tag finish!
Take your magic wand, on the following settings
Mode= add/shift tollerance 10, anti alias and contingious checked.
Activate the Outline layer on the template and click inside the lions face, it might take a few clicks to select all of it.
Once done, selections modify, expand by 2.
Add a new layer below the outline layer and floodfill the face sections a colour of choice.
Deselect.

Now we're going to colour his mane.
Photobucket
Take your magic wand and activate the outline layer again. Select roughly every 3rd space of the mane.
Add a new layer and drop it below the outline layer but keep it active.
Selections, modify, expand by 2. Floodfill a colour of choice. I used a pale brown at this stage.
Deselect.
While still on the same layer check for any tiny little spaces you may have missed that should be the same colour and using your freehand tool carefully select around each space. Selections, modify, expand by 1-2 depending on how accurate your freehand was. Floodfill with the same colour.
Deselect.

Pick another lion-ish colour. I chose a pale yellow this time. And taking your magic wand on the same settings, activate your outline layer again and select some more spaces. Aiming for half of the ones left blank now.
Once you've selected the ones you want, selections, modify, expand by 2. Add a new layer, drop below the outline layer and floodfill the selections with your chosen colour.
Dont deselect yet! Take your freehand tool and select any tiny spaces the wand couldnt get to, modify expand by 1-2 depending on your freehand accuracy, flood fill the tiny selections.
Deselect.

Repeat the above steps with a 3rd and final colour. I used an orangey colour.

Add a nice eye colour by selecting the iris area and colouring blue/green/brown whichever you prefer.

Hooray all fiddly bits are done!

Now hide your outline layer and background layer and merge visable the others. Unhide the outline and background and activate the outline layer again.
Grab your magic wand on the same settings as before and this time select all the spaces in front of the lions face and the gap between the edges of the circle and the face. Set your foreground to a gradient of choice. I used the metalic gold that comes with psp 9. Set to radial, add a new layer and drop it below the outline layer.
Selections, modify, expand by 2-3 see which looks best on your tag then floodfill this layer with the gradient.
Deselect.
Duplicate this gradient layer for a total of 3.

On the bottom layer add eyecandy HSB noise with the following settings -


Photobucket

Activate the second layer and add the same settings again but press the random seed button once.
Activate the last of the 3 gradient layers and apply the settings again pressing random seed once more.

Now activate the background layer.
Choose a paper from Sabre's golden memories kit and copy and paste it as a new layer just above the background.
Layers, new mask layer, from image. Browse to your mask in the dropdown box and apply with luminance checked. Right click this layer in the pallete and merge group.
I duplicated my mask and rotated the duplicate a little to make it seem like there were more flares.


Choose any elements and embelishments you like from the kit and resize and place them where required.

Now set your foreground onto some crazy colour like neon green, one that really clashes with your tag and background on nil.
Grab your preset shape tool set on elipse, line width of 3 and draw out a circle the same size as the lion template.
Select your text tool and choose a font, hold your mouse over the top left edge of the circle and when you see your curser turn into an A click. Now change the colour of your background to a complimentary colour from your tag and turn the foreground off. Size of around 40, type out Lucious Leo, or any other phrase you like.
Click the + sign next to the vector layer in your pallette and X out the elipse layer. Then right click and convert to raster.
Add bevel or filters to your text now.
Add a drop shadow too if desired.

Add your tube and a dropshadow of choice.

Using the same background colour grab your text tool again and type out your name/text at the bottom. Convert to raster and add any text effects you desire.
Add all © information and license number if required.

Now X off the top two gradient layers in your pallette. Right click the top bar of your canvas and copy merged.
Paste into Animation shop as a new animation.
Back to psp, un X the middle gradient layer and right click, copy merged again.
Back into ani shop, paste after current frame.
Back into psp, un X the top gradient layer and right click, copy merged.
Back into ani shop paste after current frame.
View your animation!
If you like the speed then save as gif. and your done.
If you'd prefer it faster or slower play around with the frame properties until you have the speed you want.

Thanks for trying my tutorial :]

Spooky Set ~ ~ ~ Free

SPOOKY SET
Cos I like spooky stuff anytime of the year I have made you these.
Hope you like them!

Photobucket

Download HERE

remember our TOU's and say thanx lol